
When installing or replacing a light fixture, one common scenario you may encounter is dealing with a fixture that has only black and white wires. Understanding the purpose of these wires and how to safely connect them to your home’s wiring is crucial for a successful installation. If you find yourself in this situation, this guide will walk you through the necessary steps, ensuring that your light fixture is installed both correctly and safely.
Understanding Basic Electrical Wiring
 Before diving into the specifics of connecting a light fixture, it’s important to understand some basic principles of home electrical wiring. In modern electrical systems, different colored wires serve distinct purposes, which can help you understand what to do when installing a fixture.
In a typical home setup, the black wire is referred to as the “hot” wire. This wire carries electricity from your home’s breaker box to the light fixture, supplying power for it to function. The white wire, on the other hand, is the “neutral” wire. Its purpose is to return the electricity from the fixture back to the breaker box, completing the electrical circuit.
In most cases, modern light fixtures and home electrical systems will also have a ground wire, typically either bare copper or green. The ground wire is crucial for safety, as it provides a path for electricity to dissipate safely in the event of a short circuit. However, it is not uncommon to encounter fixtures, especially older ones, that do not have a ground wire. Understanding how to handle this situation is essential for proper installation.
Ensuring Safety Before You Start
When working with electricity, safety must always come first. Before you begin the installation process, ensure that the power to the light fixture is completely turned off. This can be done by flipping the appropriate circuit breaker switch for the room in which you’ll be working. Even if you think the power is off, it’s always a good idea to use a voltage tester to confirm that no electricity is flowing to the wires.
It is also important to work in a well-lit environment. Adequate lighting will help you see the wires clearly and ensure that the connections are made properly. Having the right tools on hand, such as wire strippers, pliers, screwdrivers, and a voltage tester, will also make the job easier and safer.
How to Connect the Black and White Wires
Once you have ensured that the power is off and you have all the necessary tools, it’s time to connect the black and white wires of your light fixture.
Connecting the Black (Hot) Wires
First, identify the black wire coming from the ceiling or wall where the light fixture will be installed. This black wire is the “hot” wire that carries electrical current from your home’s electrical panel to the light fixture. The light fixture itself will also have a black wire, which needs to be connected to the black wire from the ceiling.
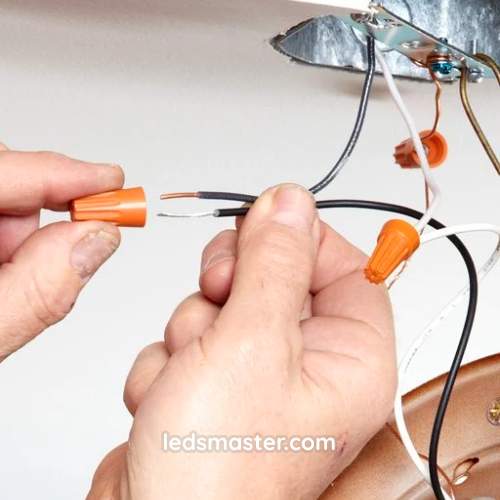
To make this connection, twist the exposed ends of both black wires together. Once the wires are twisted securely, cover the connection with a wire nut, twisting it tightly onto the wires to ensure a solid connection. The wire nut will help prevent the wires from coming loose and potentially causing a short circuit.
Connecting the White (Neutral) Wires
Next, locate the white wire from the ceiling or wall, which is the neutral wire. This wire completes the electrical circuit by returning the current to the breaker box. The light fixture will also have a white wire that corresponds to this neutral connection.
As with the black wires, twist the exposed ends of both white wires together. Once twisted, secure the connection with a wire nut. It’s important to make sure that the wire nut is tightly in place and that no copper wire is exposed, as exposed wiring can be a safety hazard.
What to Do If There Is No Ground Wire
In some cases, you may find that your home’s wiring or the light fixture itself does not have a ground wire. Modern electrical codes typically require grounding for new installations because it provides an added layer of protection against electrical shocks and fires. However, many older homes and fixtures do not have a ground wire, which can raise some concerns.
If your fixture doesn’t have a ground wire, it’s important to first inspect the electrical box in the ceiling. In some cases, the metal electrical box may be grounded, even if there is no ground wire present in the fixture. If the box is grounded, you can attach the fixture’s ground wire (if it has one) to the box using a grounding screw.
If neither the fixture nor the box is grounded, it may still be acceptable to install the fixture, especially in older homes where grounding was not originally required. However, if possible, running a new ground wire to a grounded location in your home is always a safer option. This might require the help of a licensed electrician.
Double-Checking the Connections
Once you’ve connected the black and white wires and addressed the ground wire situation, it’s essential to double-check all of your connections. Make sure that the wire nuts are securely fastened and that no bare wire is exposed. Tuck the wires carefully back into the electrical box, ensuring that there is enough space for the light fixture’s base or canopy to sit flush against the ceiling or wall.
Once the wires are safely inside the box, secure the fixture to the electrical box as instructed in the manufacturer’s guide. This may involve screwing it into place or using mounting brackets, depending on the type of fixture you are installing.
Restoring Power and Testing the Fixture
With everything connected and secured, it’s time to restore power and test the light fixture. Go to your circuit breaker and switch the power back on to the room where you’ve been working. Once the power is restored, use the wall switch to turn on the light and test if it’s functioning properly.
If the light comes on without issue, your installation was successful. If the light does not turn on or flickers, turn the power off again and double-check the wiring connections. Loose connections are often the cause of flickering or non-working fixtures, so it’s essential to make sure all wire nuts are tightly in place.
Handling Fixtures With More Than Two Wires
 In some situations, you may come across a light fixture that includes more than just the black and white wires. These additional wires are often tied to specific functions, like operating multiple switches or controlling other integrated features such as fans or separate lighting components. Knowing what these extra wires represent and how to properly connect them is crucial to ensure the safe and efficient operation of your fixture.
Common Extra Wires in Light Fixtures
One of the most common additional wires you may encounter is a red wire. In many wiring setups, the red wire is typically used in three-way switch systems or dual-switch configurations. For instance, if you have a setup where two switches control the same light fixture, the red wire is often the conductor that allows these switches to communicate with each other.
Another possible wire you may encounter is a blue wire, which is often used in fixtures that have a built-in fan or a separate light and fan system. In such cases, the blue wire might control the fan function, while the black and white wires handle the lighting component. The blue wire could also represent an additional light source within the fixture, such as a second bulb that works independently of the primary light.
How to Identify and Connect Extra Wires
When dealing with these extra wires, it’s essential to refer to the manufacturer’s installation manual. The manual will provide a detailed guide for understanding what each wire is intended for and how it should be connected to your home’s electrical system. The red wire may need to be connected to another red wire in the electrical box, or it might need to be paired with a specific switch. In some cases, a red wire might be connected to the same switch as the black wire, depending on your home’s wiring configuration.
If your light fixture includes a blue wire and you’re installing a fixture that also features a ceiling fan, the blue wire is typically connected to the black wire from the ceiling to operate the fan. However, it’s important to carefully follow the instructions in the manual to avoid connecting wires improperly, which could result in malfunctioning equipment or, worse, an electrical hazard.
Testing the Fixture with Extra Wires
After connecting the extra wires, it’s important to test the fixture. Restore power to the fixture and test both switches (if applicable) or the fan to ensure everything functions correctly. Pay close attention to whether the correct components—such as the light or the fan—are responding as they should. If something isn’t functioning properly, turn the power off again and check the wire connections.
If you feel unsure about which wires to connect, or if the instructions are unclear, it is safer to consult a professional electrician. Incorrect connections could lead to the fixture malfunctioning, damage to your home’s wiring, or even electrical fires.

When to Call a Professional
Though many homeowners feel comfortable handling basic electrical installations, some situations demand professional expertise. Electrical work is inherently risky, and mistakes can result in serious consequences, such as electrical shocks or fires. Knowing when to step back and call a licensed electrician can make a difference in ensuring both your safety and the functionality of your home’s electrical system.
Older Homes with Outdated Wiring
If you live in an older home, you may be dealing with outdated wiring systems like knob-and-tube wiring or aluminum wiring. These older systems were designed before modern safety codes were put in place, and they can present challenges when installing new fixtures. For example, knob-and-tube wiring lacks a grounding wire altogether, while aluminum wiring can degrade and become a fire hazard if mishandled.
Attempting to install a light fixture on your own in these types of systems could result in dangerous conditions. If you suspect that your home has outdated wiring, or if you’re unsure about the type of wiring present, it’s best to call a professional. An electrician will be able to safely handle the installation, and if necessary, they can upgrade your home’s wiring to bring it up to modern safety standards.
Complex Wiring Systems
Many modern homes have complex wiring setups, especially in homes with multiple lighting configurations, smart home systems, or dual switches. If your light fixture is connected to a three-way switch or if multiple switches control the same fixture, navigating the wiring connections can be confusing. Making an incorrect connection in these systems could lead to malfunctioning switches, lights that flicker, or fixtures that don’t work at all.
For homeowners unfamiliar with how these systems operate, installing a fixture in such a scenario can quickly become overwhelming. In these cases, an electrician’s expertise ensures that everything is connected correctly, avoiding issues that could be costly or hazardous in the long run.
No Grounding in the Electrical Box
If you’ve determined that neither your home’s wiring nor the light fixture has a grounding wire, this can be a potential safety concern. While older homes may not have been built with grounding wires, modern electrical codes require them to reduce the risk of electrical shock and fire. If you’re unsure whether the absence of a ground wire is acceptable or safe in your particular case, a licensed electrician can provide guidance.
An electrician can also upgrade your wiring to include a ground wire if necessary, ensuring that your electrical system is both safe and compliant with current standards. While some homeowners attempt to install a ground wire themselves, this often involves rerouting or running new wire, which can be a more complex job than it appears.
Potential Electrical Code Violations
Local and national electrical codes exist to ensure the safety and functionality of electrical systems. If you are unfamiliar with these codes, there is a risk that your DIY installation may not meet the required standards. This could be especially problematic if you plan to sell your home in the future, as any electrical work that does not meet code may need to be re-done by a professional.
Hiring a licensed electrician ensures that your light fixture installation complies with these codes. Not only does this provide peace of mind, but it also protects you in case of a home inspection or insurance claim. A licensed electrician can issue a certificate of compliance for the work, which might be required by insurance companies or home inspectors.
Conclusion
Installing a light fixture that has only black and white wires is usually a straightforward process, as long as you follow the correct procedures and prioritize safety. Connecting the black (hot) wire to the black wire from the ceiling and the white (neutral) wire to the corresponding white wire will ensure that the fixture functions as intended. If you ever feel uncertain, don’t hesitate to consult a licensed electrician to avoid any potential risks.